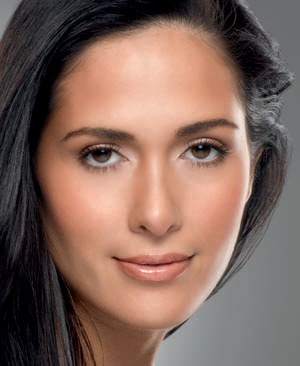
An oval face shape is considered to be the perfect face shape, so in order to make your face look thinner and more sculpted, you want to shape your face so that it looks more oval. And best of all, you can do this by using nothing more than foundation and powder. By thinning out the face using the makeup techniques below, you’ll be surprised at what a youthful glow your face will have and what a difference it will all make. Keep reading below to find out how to look thinner and younger in just a few simple steps.
Look Thinner and Younger With These Makeup Tips
The basic sculpting method involves highlighting and contouring the face. Basically, everything you highlight comes forward and everything you contour stays in the background. So in short, you want to highlight your good features and contour the ones you want to hide. To start, you’ll need three different shades of foundation/powder in three different depth levels:
- The first foundation shade should match your skin exactly.
- The second shade which should be your highlight color, should be one level lighter than the first, preferably with the same undertone.
- The last shade which is your contouring color, should be one level darker than the first, again preferably with the same undertone.
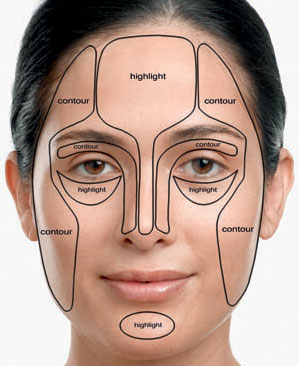
 The diagram above should help you with the placement of the foundation. The most important thing to remember is to blend the foundations really well because the blending process is what makes the sculpting method work and look natural.
Step 1:
Apply the first foundation (your true shade) all over your face, blending it well. Start visualizing an oval face. The width of the oval is your eye sockets the height and length of your oval extends from the tip of your forehead to the tip of your chin.
Step 2:
Take the second foundation (your highlight shade) and apply it to the high points inside the oval. This includes your forehead, under the eyes, at the top of the cheekbones and the tip of your chin. So say your face is a little fuller, this will attract the attention to the narrow area to the middle of the face.
Step 3:
Lastly, apply your contour shade (the darkest one) to the areas outside the oval. This includes the the temples, along the hairline, the sides of your cheeks and down the jaw. By deepening these areas, your are making them visually recede and your face to appear more narrow and oval.
Step 4:
Now of course everyone will use different shades according to their skin tones so if you have ivory/beige skin, you’ll contour more than highlight – same goes for really pale skin. If you have bronze/ebony skin you will highlight more than you contour.
Step 5:
Finish up the process by applying powder to your face after you’ve blended all three foundations. For even more dramatic effect, use a different powder to match your three foundations. So use a regular one for your regular foundation, a lighter one where you highlighted and a darker one where you contoured. If you have just one shade of powder, then just use that all over the face. This will help ensure a smooth finish.
Step 6:
Find the perfect blush and then apply it to the apples of your cheeks for a youthful glow. And there you have it; a skinnier, younger looking face just take a few minutes!


i love it tip’s for girls you girl’s should! go on how to get a boyfriend! and hairstyles ! so cool and Beauty tips for girls!!!! email me on facebook skittles7@hotmail.comor on msn snider7@hotmail.com
good but i need information abt sex so i cam go in bed with ma bf u knw im already preety so i dont need this stuff so tell sum stuff abt wat 2 do in bed….
….wow way to hide the fact that you’re black. Nice grammar.
RUDE MUCH!!!!!
Thanks for all good tips