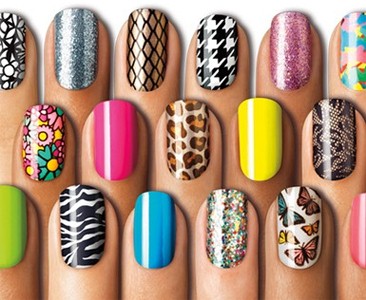
If you haven’t already heard of Sally Hansen Salon Effects, you’re in for a treat! Being a nail polish junkie, I couldn’t wait to give these super cute nail polish sticks a try, and I must say I was pretty impressed! There are so many unbelievably cute designs and colors to choose from, that the selection will leave you stumped! No matter what the occasion, the Sally Hansen Salon Effects collection will have something for everyone and every thing!
Sally Hansen Salon Effects Review
What I loved about the Salon Effects from the get-go was the unbelievable array of gorgeous patterns that you can see above. There’s literally a pattern for every mood and every occasion, so when I decided to pick one up I stood there for a good half hour trying to decide which one would come home with me!
Finally, I decided on the flower pattern called “Girl Flower” (see above) mainly because it was my first time using these and figured that if I made any mistakes, the pattern would be forgiving enough.
First off, if you’re a fan of nail art and you don’t have the skills to do it yourself, I highly recommend the Sally Hansen Salon Effects. What’s great about them is that they’re not actually nail stickers, but they are REAL nail polish strips. Once you put them on, they look like nail polish, feel like nail polish, and you even take them off using nail polish remover. But best of all there is NO DRY TIME and they claim that it lasts up to 10 days. So, I’ve put it to the test!
MY VERDICT
APPLICATION:
The Sally Hansen Salon Effects comes with 16 nail polish strips to fit different sized nails, a double sided mini buffer, and a cuticle stick. You also get very easy to understand instructions so there is no room for mistakes!
Before starting, make sure your nails are free of any nail polish, and perfectly clean. Follow the instructions by buffing and filing your nails. Also, push your cuticles back for best results.
Choose the strips that best match your nail size and begin by peeling off the backing of the strip. Carefully press onto your nail and file off the excess. Now the instructions say to file off the excess, but if you have shorter nails like me, there is A LOT of excess and so the filing didn’t really work. What I did tho, was that I bent the strip where my nail ended and just ripped the excess off. Finally, I filed away any imperfections.
END RESULT:
So I left my “Girl Flower” pattern on for 8 days, and although I had NO chips, my nails were starting to grow in so I just decided to remove them. But all in all, I was pretty pleased with the results as well as how long they lasted. Also, after about 6 days, I could tell the color wasn’t as bright and vivid anymore, but it still looked very pretty!
Now I haven’t tried on any other patterns, but I can imagine that the simple ones that don’t have patterns are probably a little trickier to work with so just make sure you take your time and be patient.
Other than that, for about $8, it’s a GREAT investment considering that getting a manicure is much more expensive and doesn’t even last as long. I would definitely recommend Sally Hansen Salon Effects to anyone that loves nail art or just nail polish in general. It lasts long, it’s easy to apply, there are tons of colors and patterns to choose from, and it’s relatively cheap when compared to a manicure.


i love sally hansons, its he best!
Salon Effects r so cute i really <3 them!
-Katlyin Perry (Katy Perry)