If you’re like me and just cant get enough of all the different styles and combinations that are possible with ear piercings, than you’ve got to know just how easy it is to get the look you’ve always wanted. Going to the store to get your ears pierced can cost lots of money and take all day. Of course, I must do a super disclaimer and advise everyone who is looking to pierce their ears at home: get informed, do it with caution and be supervised. Here are the do’s and don’ts of ear piercing and care.
This ear piercing etiquette will help you get informed on what to do and what not to do when piercing your own ears! As always use caution, and get a friend to help you out!
Ear Piercing Etiquette Guide

#1. Get Informed
This act requires precision, bravery and brains. Your earlobes are simply connective tissue and skin, they lack proper support and therefore are soft and susceptible to gravity. Always sleeping with earnings or wearing heavy, long ones can damage them by stretching them out and can cause tears if pulled or tugged incorrectly. When you first pierce your ears, you are very likely to get it caught in your hair or t-shirts, so always be weary.
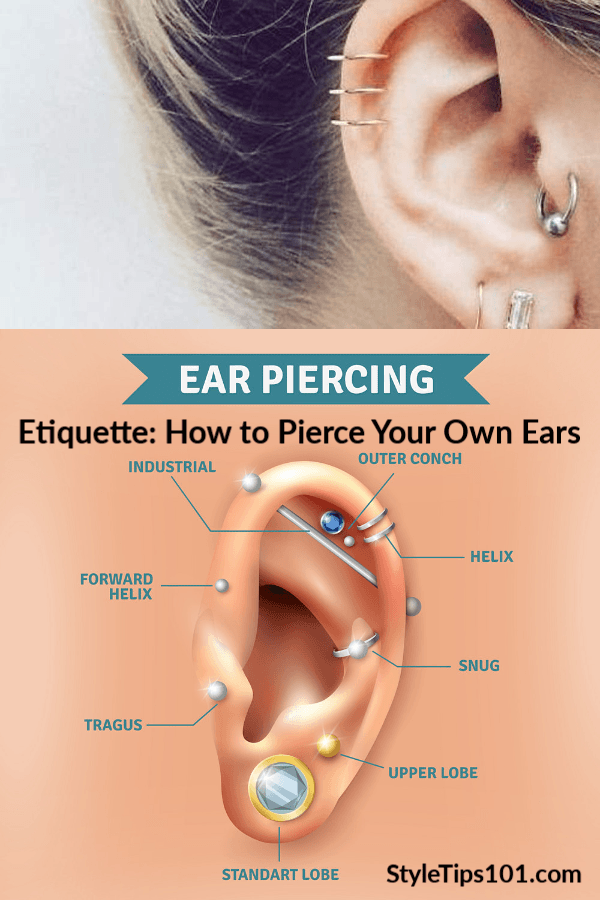
The cartilage is much tougher tissue that give our ears its shape. Piercing this part will require a stronger push and a little more attention as it is more painful. It is safe to do them here because there are no major veins, nerves or arteries to damage. If you are looking to do an industrial piercing, conch piercing (the inner bowl of your ear, or a tragus piercing (the small lump that comes out of the side of the face and protects the ear hole), I would suggest going to a professional as doing them incorrectly can cause very upsetting complications.
#2. Use Caution.
- The most important tip would be to keep your materials clean. You will need a stainless steel, medium thick needle or a gold or stainless steel earring with a pointy tip.
- Be sure to soak all of your materials in rubbing alcohol and clean the section of the ear which you will be poking and always wash your hands with anti-bacterial soap.
- If you don’t want to prick your finger or your skin while pushing it through, you can use an apple and put it behind your ear to keep the soft skin firm and reduce the risk of injury.
- If you would like to numb the ear to reduce pain with some ice, hold it on the ear for a few minutes.
If would be best if you are with a friend or family member while in action. So under supervision, just in case you have any issues, you can hastily poke the needle or earring all the way though your skin until you hear a small pop from it exiting. You want to do this at a good pace as pushing it slowly will not get the needle through and too quickly can cause pain and can cause it to go in wrong.
Once in, you can either put the back of the earring on and clean it again or gently pull the needle out with your desired earring following it. Be sure to clean it afterwards and use either gold or stainless steel. Try not to sleep on your ear and be extremely careful with shirts and hair do’s. You will want to clean it every day and leave the earring in for a few days while it heals. (Healing lobes can take anywhere from 4-8 weeks and healing cartilage can take up to 6 months but the very sensitive time frame is the first 2 weeks.)
Always use proper ear piercing etiquette!
Don’t forget to like and share!


Great tips. Thanks!