
If you’ve never heard of a silk wrap, you’re definitely not alone! So what is a silk wrap and how to silk wrap your hair? A relatively new hair treatment technique, silk wrapping involves wrapping dry hair (using saran wrap) with a bit of moisturizer and a shine spray under a hooded dryer. The goal of a silk wrap treatment is to give relaxed hair that flat iron, silky, and shiny look after just one treatment. Silk wrapping can actually also apply to nails, where you apply a piece of silk fabric, such as a silk scarf, onto a broken nail to mend it!
What is a Silk Wrap?
The reason why the silk wrap is so popular is because it doesn’t damage the hair like other hair treatments that use a ton of heat. Getting straight hair using the hair wrap method is easy, safe, and a natural alternative to using harsh chemicals and intense heat.
For those with natural hair that has been pressed, the treatment will work the same but will also reduce the volume, for a flatter style. You can silk wrap your hair straight after roller setting to smooth the hair out. If you have natural hair that has been straightened smooth, a silk wrap can be used a week later to make the press last longer and keep its shape.
How to Silk Wrap Your Hair
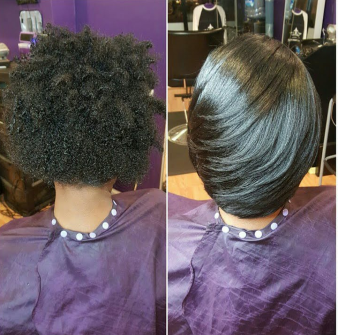
The technique of silk wrapping is not at all hard to do, and will give you some pretty awesome results without spending a fortune or damaging your hair! The process of straightening natural, curly hair can be a daunting one, and can also differ from person to person. Those with naturally thick and curly hair, can greatly benefit from silk wrapping. It’s something that can be done in the comfort of your own home.
Oh, and did we mention how much money this can save you? The answer is a LOT! So instead of spending your hard earned dough at the salon, spend it on something more worthwhile!
The Process of Silk Wrapping:
- Before starting, make sure your hair is completely dry. If hair is relaxed, roller set first, or, if natural, follow your usual routine of straightening your hair.
- Grab about a dime-sized amount of your moisturizer (preferably a heat protectant one to prevent heat damage). Rub into your hair concentrating on ends. Use a comb to distribute evenly throughout your hair.
- Brush the hair into a smooth wrap and do not use any pins as this may give you creases in the end. If need be, spray a light layer of an oil sheen spray.
- Apply the saran wrap over your hair, and make sure that it’s firmly secured.
- Blow dry your hair for about 10 to 20 minutes.
- Remove the plastic wrap and comb out the wrap.
- Your hair should be silky smooth and straight!
Depending on how processed or curly your hair is, you may need to repeat this process several times to ensure straight, silky hair. Use the lowest heat setting as not to burn your hair, and always ensure that you use a heat protectant cream. To keep your tresses nice and smooth, wrap your hair at night with a silk scarf to ensure the style stays intact.
You might be wondering, is silk wrapping safe for those wavy or straight hair? Although not highly recommended, you CAN silk wrap hair if you already have straight or wavy hair. This method is more so for those with naturally curly hair. If you just want to achieve really straight hair with tons of shine, you can definitely use this!
A few very IMPORTANT things to consider when silk wrapping:
- Be very careful when blow drying your hair. Because you’re applying heat to the saran wrap (which is made out of plastic), you must be really careful not to get too close to the scalp. The last thing you’d want is for the plastic to melt into your hair. Can you say nightmare?!
- Don’t overdo it. Don’t let the heat on for too long. Depending on the length and thickness of your hair, blow drying times may vary. Check the dryness of your hair consistently to make sure you’re not burning your hair. Over drying can cause hair breakage, dryness, and can also lead to hair loss.
- Use a good quality hair moisturizer as well as a weekly deep conditioning treatment for healthy hair. We recommend Alikay Naturals Moisturizer Rich Hair Parfait which is a cult favorite of those with kinky hair. It has the ability to to enhance shine, help straighten, and is known for its amazing manageability properties. Additionally, it’s also made with all natural ingredients such as shea butter, coconut oil, and argan oil. These all work together to soften, smooth, and hydrate dry, parched hair. Check out 14 other moisturizing products for coarse, thick hair!
- Know what works for you and what doesn’t. Unfortunately, what may work for others, may not work for you, and vice verse. So if you try to silk wrap and it doesn’t work for you – don’t fret! It may be just that your hair won’t take to the process, but thankfully the Internet is filled with hundreds of natural at-home hair remedies which you can try!
How to Silk Wrap Your Hair

A quick and easy guide on how to silk wrap your hair at home. Silk wrapping is great for those with natural hair and it's a much gentler way of smoothing the hair.
Before starting, make sure your hair is completely dry. If hair is relaxed, roller set first, or, if natural, follow your usual routine of straightening your hair.
Grab about a dime-sized amount of your moisturizer (preferably a heat protectant one to prevent heat damage). Rub into your hair concentrating on ends. Use a comb to distribute evenly throughout your hair.
Brush the hair into a smooth wrap and do not use any pins as this may give you creases in the end. If need be, spray a light layer of an oil sheen spray.
Apply the saran wrap over your hair, and make sure that it's firmly secured.
Blow dry your hair for about 10 to 20 minutes.
Remove the plastic wrap and comb out the wrap.Your hair should be silky smooth and straight!
Depending on how processed or curly your hair is, you may need to repeat this process several times to ensure straight, silky hair. Use the lowest heat setting as not to burn your hair, and always ensure that you use a heat protectant cream.
Like this post? Share, Pin, and Comment Below 🙂
What type of moisturiser are you talking about? And how do we wrap the hair? Pics would of been good to get a better idea, and for me I have no idea what you mean by relaxed hair lol and how do we roller set it, I think it should be explained more for people who are not hairdressers, more in lamens terms not so technical please x
Yvonne,
Silk wrapping is usually only done for black hair, so if you’re Asian or Caucasian, silk wrapping is not for you. But to give you a little more explanation, a moisturizer would be any moisturizing hair cream, and again, those are mostly used by those with this type of hair as it is much coarser. Relaxed hair is hair that has been permanently straightened using creams and a straightening method…it’s basically the reverse of a perm 🙂
How long does a silk wrap hair last?
Hi Terry,
A silk wrap will usually last until you wash it out or style it again.
can i get this done at the salon?
Hi Angelika,
Not all salons do it, but I know that some do. It’s best to call around and see who does it though.
What is the difference between a silk press and a silk wrap?
Unlike a silk wrap, a silk press is only done on natural hair. This means that you are straightening relaxed hair with a flat iron. A silk press involves more products, while a silk wrap is more of a process. Also, when doing a silk press, there is no saran wrap.
how often can i silk wrap my hair?
Hi Alexa,
This totally depends on the health and condition of your hair. Because silk wrapping doesn’t involve too much heat, it should be ok to do about once a week.
cannot wait to try this tonight!!
Please let us know how it worked out for you 🙂
Good recipe, thank u fr sharing!!
Thanks Shandaya 🙂
can i use any type of moisturizer?
Hi Maleeka,
Yes, you can use any type of natural hair moisturizer, as long as it’s good quality. The moisturizer should be thick and contain shea butter or a type of carrier oil, such as coconut oil.
Works really well, but just remember to have your drier on the lowest heat setting or u can burn ur hair!
Yes, absolutely, thank you Sally!!
Do I sit under the dryer or am I using a blow dryer for 10 minutes?
Hi Veronica,
Either one of those options will work 🙂 Obviously if you have a dryer you can sit under, it would be much easier on your arms hehe
This is not a new method. My hairdresser in Fla was doing this on my hair in early 2000.